Removing a Bios – CMOS Password
Unfortunately, access to computers can, at times, be blocked for all of the wrong reasons. Sometimes this occurs due hardware related issues such as electrical problems or due to inadvertence, such as someone setting and then forgetting the password. It can happen as the result of accidental use of a Bios password by a new user. This also often occurs when an employee who is quitting or has been terminated, sets the Bios password as some form of retaliation against an employer. Reversing this can be time consuming as well as very frustrating depending upon the motherboard manufacturer and the make and model of the motherboard. Relax though, as it is possible to reset or disable the password.
Electrical or static related issues:
At times, and without any obvious reason, static discharges as well as other electrical problems can cause the PROM on the motherboard to reset the Bios (CMOS) to its default values and even cause the default Bios password to be set. These are some of the default Bios passwords used with different Bios’s, give them a try first.
|
|
| NOTE: With respect to the Award BIOS, the “AWARD_SW” (use without quotes) and (is is case sensitive) password should even override a set password! If not, you may also want try j262 as the password. |
Removing Arbitrary or Revenge Passwords:
Many times we have had customers contact us explaining that either an employee or family member has set a Bios password and then forgot what it was, making access to the computer impossible. A few times we have seen vindictive employees set Bios passwords as their way of getting even with their employer. Most times though, this is a well-meaning effort on the part of an employee to secure employer data, so don’t punish the employee if this is the case. As far as family members are concerned, we have heard just about every explanation possible ranging from adults trying to regulate computer use by their children or one adult trying to curb computer use by his or her significant other. We have even had some reasons that we simply can’t publish here. In any event, reversing the setting of this password is not impossible, it just takes some thought and some work.
If you have tried the passwords listed above and none have worked, then there are a few more options to try. You can attempt to erase the Bios/CMOS settings and have the Bios return to its default settings or you can use use a Bios/CMOS password utility (password crack) to try and erase or reset the password.
Forcing the Bios-CMOS to be Reset to Default Values:
There are two ways to approach forcing the Bios/CMOS to be reset to its default values: Option #1: Mechanically, by removing all power to the Bios/CMOS thereby forcing it to reset itself to its stored defaults, which include no password or the default password employed by the Bios manufacturer, and Option #2: Using a program to either locate and identify the password and reveal it to you or erasing the password entirely. These are referred to as password by-pass utilities or cracks. Let’s look at Option #1 first, and then move on to Option #2 if necessary.
Option #1: Mechanically Removing the Password
Most motherboards manufactured over the last decade or more use a battery to sustain the dynamic Bios/CMOS settings for the motherboards PROM chip. These dynamic settings are those manually set by either the computers manufacturer or you, the user. There are two ways to erase these dynamic settings, by either resetting a jumper on the motherboard itself (referred to as a “clear CMOS” jumper), or by physically remove the power from the computer (disconnecting the power plug) and then removing a battery (used to maintain power to the PROM chip that contains the Bios/CMOS information) from the motherboard.
Motherboard Jumpers:
Some, but not all, motherboard manufacturers provide a set of three jumpers on their motherboards that provide you with the ability to clear the Bios/CMOS settings, thereby allowing them to be reset. For the most part this is used when the Bios/CMOS data becomes scrambled and you need to clear the Bios/CMOS in order to return the computer to a functional state. This same procedure, however, can be used to clear passwords from the Bios/CMOS setup. Typically a jumper will be found across pins #1 and #2 as the default position, and by shutting the computer down, unplugging the power cord and then moving the jumper so that it is across pins #2 and #3 will clear the Bios/CMOS settings.
Here’s an example of a Supermicro PIIISEA motherboard.
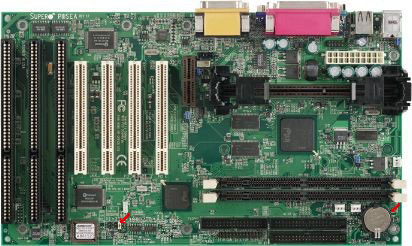
As you can see from the picture, we have added two small red arrows. The arrow to the left denotes the location of the “Clear CMOS” jumpers, while the red arrow to the right denotes the location of the CMOS battery.
Here are the procedures if the jumpers are present on the motherboard:
- Locate, if possible, the instruction booklet for your motherboard. If you cannot locate the booklet, then user the motherboard references on this site to locate the manufacturer and see if a manual is available there. You may also want to closely examine the motherboard itself.
- Shut down your computer and disconnect the power plug.
- Now identify where the jumpers are located, then check the present pin location and the location of the jumper on those pins to determine their default location. As an example, the default location on the above motherboard is to have the jumper across pins #1 and #2. Write it down!
- Next, move the jumpers from the their default location (Example: from across pins #1 and #2 as above) and then place the jumper across pins #2 and #3.
- Leave the jumper in place for 20 to 30 seconds and then return it to its default location.
- Now plug the power cord back in and restart the computer.
- When the computer begins it’s startup (boot) process, tap the DEL, F10 or F1 key, (whichever is appropriate for your computer) to get into the Bios/CMOS setup. If you need more detailed information as to how to get to the Bios/CMOS setup, follow this link. Bios Basics
- Once into the Bios/CMOS setup, look for a section or area to set the Bios/CMOS to its default settings. This will return the motherboard to either its basic or optimum settings depending upon the motherboard manufacturers settings. You will then need to verify certain settings, such a CPU and memory as well as hard drive type and size recognition. If you need more information regarding these settings, follow either of these links: For an AMI Bios or for an Award Bios.
- After making any final adjustments, save your settings and restart the computer. The Bios password should be gone and the Bios set to its optimum settings.
If the “Clear CMOS” jumpers are not present or not available:
The procedures for clearing a Bios/CMOS without jumpers is essentially the same as those given above when they are present, it just takes a little more effort.
- Shut down the computer and disconnect the power plug.
- Locate, if possible, the instruction booklet for your motherboard. If you cannot locate the booklet, then user the motherboard references on this site to locate the manufacturer and see if a manual is available there. You may also want to closely examine the motherboard itself.
- Now identify where the battery is located on the motherboard. It will be approximately 1/2 inch in diameter.
- Normally these batteries are held into place with one or more small clips over the face of the battery. Carefully lift the battery out of its socket and set it aside. Note: Some batteries are actually soldered to the motherboard, so take that into consideration and be careful.
- Leave the battery our of the computer for about 20 to 30 minutes and then return it to its socket.
- Now plug the power cord back in and restart the computer.
- When the computer begins it’s startup (boot) process, tap the DEL, F10 or F1 key, (whichever is appropriate for your computer) to get into the Bios/CMOS setup. If you need more detailed information as to how to get to the Bios/CMOS setup, follow this link. Bios Basics
- Once into the Bios/CMOS setup, look for a section or area to set the Bios/CMOS to its default settings. This will return the motherboard to either its basic or optimum settings depending upon the motherboard manufacturers settings. You will then need to verify certain settings, such a CPU and memory as well as hard drive type and size recognition. If you need more information regarding these settings, follow either of these links: For an AMI Bios or for an Award Bios.
- After making any final adjustments, save your settings and restart the computer. The Bios password should be gone and the Bios set to its optimum settings.
Option 2: What to do if changing jumpers or removing batteries doesn’t work:
On some motherboards there are no jumpers to be moved and the battery may be soldered into place and cannot be removed. There may also be those occasions where moving jumpers or removing batteries just won’t work. This is often the case on early motherboards.
In these instances, there are three additional options to be considered.
Option #1:
You can physically remove the Bios/CMOS PROM chip from the motherboard and send it either to the motherboard manufacturer or a Bios developer for replacement of flashing. You can also send the entire motherboard to a facility experienced in these operations.
Option #2:
If the motherboard has a flash updateable Bios/CMOS PROM chip, then you can download a fresh Bios update and re-flash the PROM to eliminate the password.
Option #3:
As mentioned earlier, there are programs (utilities) and (cracks) that can be used to try and either identify the password or remove it forcibly from the PROM chip. Utilities to recover passwords are extremely expensive and are usually only sold to manufacturers and others involved in hardware and software development.
Smaller utilities and those referred to as Bios crack programs are readily available. These, however, are used at your own risk. Please read and understand our disclaimer before downloading any of these types of utilities. By downloading any of these utilities you are agreeing to the terms of our disclaimers.
Notice: Any or all of the above files should only be used by those professionals completely familiar with motherboard and Bios/CMOS issues and recovery. We make no warranty of any type as to any of these files, including their usability for a particular purpose. Using these files is at your own risk!


